Building a Strong GitHub Deployment Strategy
A well-structured GitHub deployment strategy is essential for DevOps teams aiming to streamline workflows, enhance security, and ensure reliable releases. By implementing best practices such as branch protection, automated security scans, and release tagging, teams can minimize risks and maximize efficiency. This article provides a step-by-step guide to creating a strong GitHub deployment strategy tailored for DevOps environments.
Branch Strategy Overview
A clear branch strategy is the foundation of an effective deployment workflow. Common strategies include:
mainbranch: Reserve the main branch for production-ready code. Avoid direct commits to this branch.devbranch: Use a dev branch for integrating features before they move to main.feat/*andfix/*branches: Create a new branch for each feature or bug fix. This isolates changes and simplifies code reviews.

Here, only main and dev branches are long-lived and persist throughout the project. All other branches, such as feat/* and fix/*, are short-lived and should follow a consistent merge path: feat/* → dev → main.
The long-lived branches handle your deployment workflows to the different environments. In this strategy, the dev branch automatically deploys to the development environment, while main deploys to staging. Production deployments are triggered only by tagged releases (e.g., v1.0, v1.1).
main, testing them in the staging environment, before creating a new tag release to production.Set Branch Protection
Branch protection rules ensure that critical branches, such as main, are not modified without proper oversight. Key protections include:
- Require Pull Requests: Enforce that all changes to main must go through a pull request (PR)
- Require Approvals: Set a minimum number of approvals before merging
- Status Checks: Mandate that all CI/CD checks pass before merging
How to Enable Branch Protection:
- Go to your repository
Settings > Branches - Click Add rule and select the
mainbranch - Enable Require a pull request before merging and Require status checks to pass
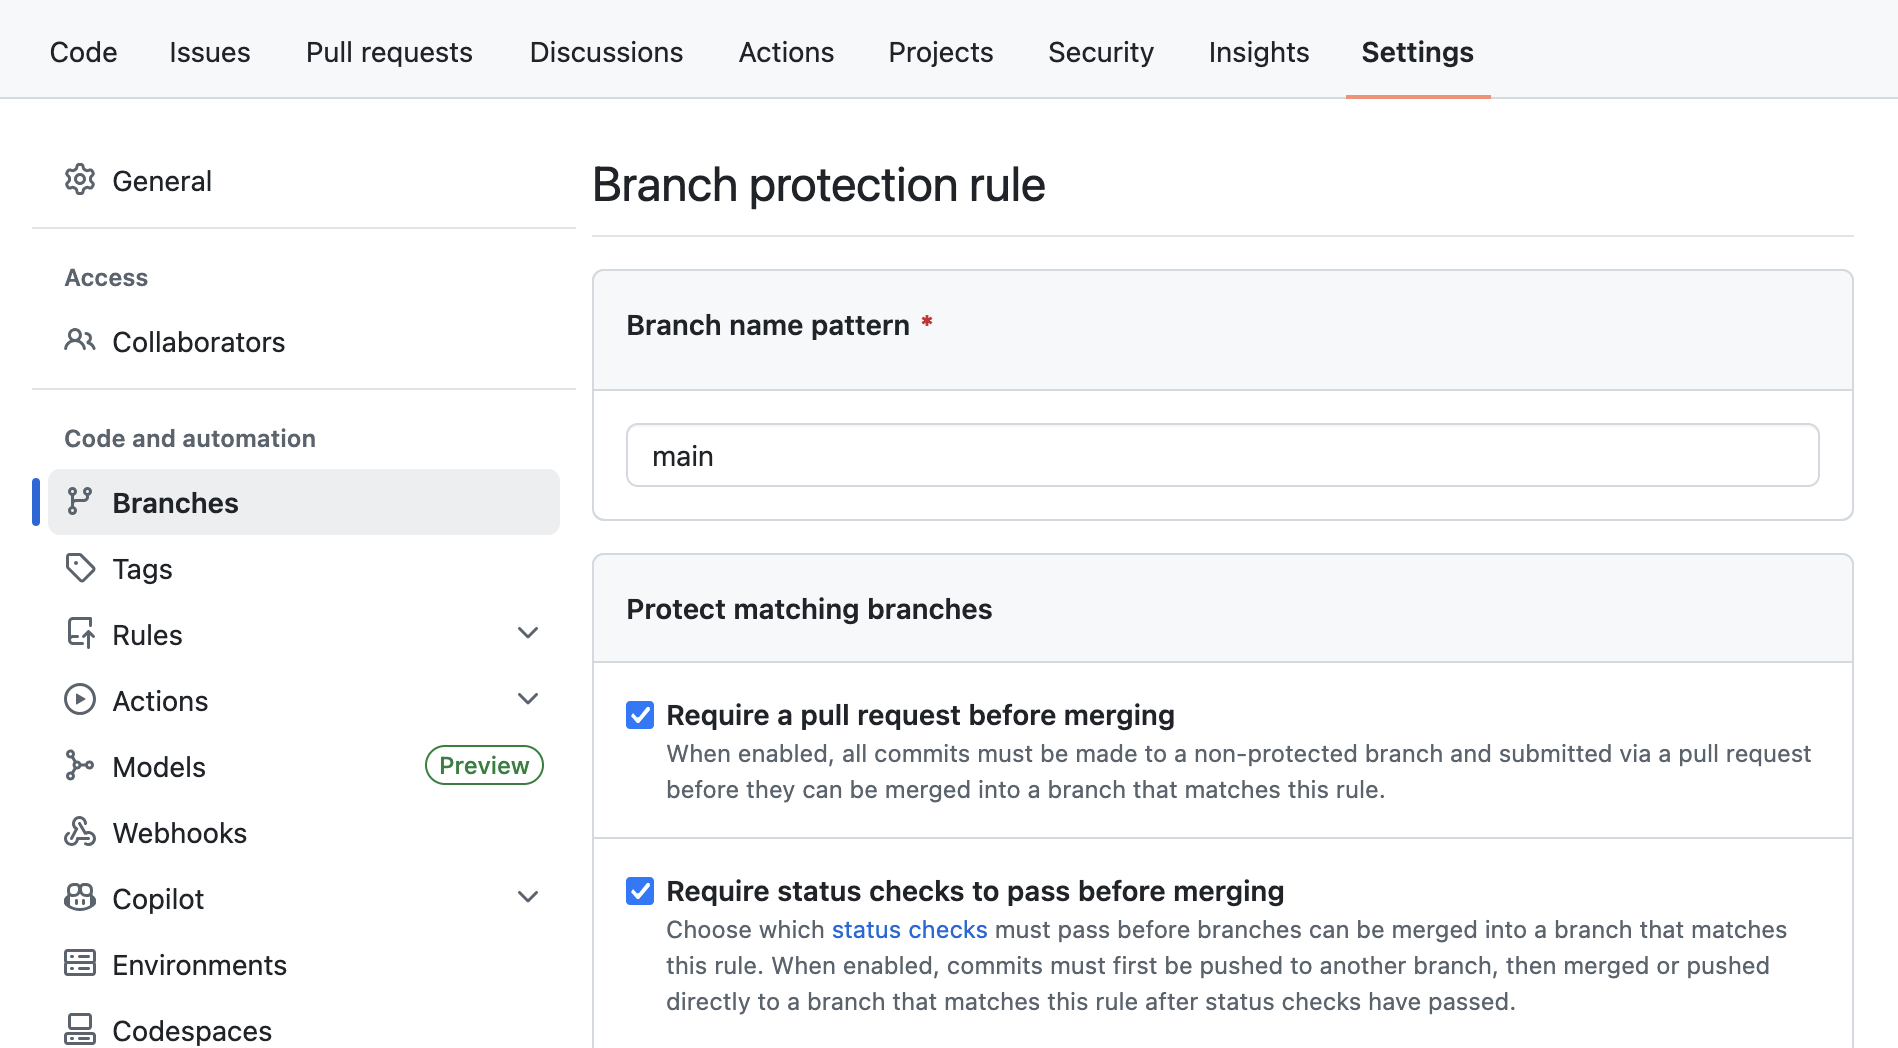
main branch so you can still push hotfix to other environments for quick troubleshooting.Add Security Scan Workflows on Your Pull Request
Security is a top priority in DevOps to avoid any vulnerabilities to be pushed (intentionaly or not) in your environments. In GitHub, you can easily create dedicated workflows that will run on every PR and block you to merge if a security finding has been identified.
- Create Security Scan Workflows: Use tools like Bandit, Checkov or Trivy to scan for vulnerabilities
- Automate Scans: Configure the workflow to run on every PR (see code snippet below)
- Block Merges on Failures: Ensure PRs cannot be merged if security scans fail
name: Security Scan

on: [pull_request]

jobs:
  scan:
    runs-on: ubuntu-latest
    steps:
      <SECURITY_TOOLS>
Upcoming guide will show you how to create such workflows. Stay tuned!
Tag Release Strategy from main Branch
Use a tag release strategy to deploy on production environment, that helps to track versions and simplifies rollbacks. Follow semantic versioning (e.g., v1.0.0) for clarity. You can read more on GitHub’s documentation on managing releases.
How to tag a release:
git tag -a v1.0.0 -m "Release version 1.0.0"
git push origin v1.0.0
Then, you can use the following code snippet to run your workflow on new tag release.
name: Deploy to Production

on:
  push:
    tags:
      - 'v*' # Push events to matching v*, i.e. v1.0, v20.15.10

jobs:
  <YOUR_JOBS_HERE>
Manage Variables with GitHub Environment
To ensure scalable management of your variables in your workflows, GitHub provides a build-in environments manager. Go to Settings > Environments and create environments to map your ecosystem. Then, add your variables and secrets.
- Environment variables: These variables are not considered sensitive and will be displayed in workflow logs. Access them from your workflow with
${{ secrets.MY_VARIABLE }}. - Environment secrets: Secrets are sensitive values that won't be displayed in workflow logs. You can use them to store API keys, tokens, and passwords. Access them from your workflow with
${{ secrets.MY_SECRET }}.
To use an environment in your Github workflow, simply specify it at the job level:
jobs:
  deploy-dev:
    runs-on: ubuntu-latest
    environment: dev # All variables and secrets for this job will be retrieved from `dev` environment
    steps:
      - run: echo "Development account ${{ vars.AWS_ACCOUNT }}"

  deploy-prod:
    runs-on: ubuntu-latest
    environment: prod # This value has to match the environment name you created
    steps:
      - run: echo "Production account ${{ vars.AWS_ACCOUNT }}"
Customize the Strategy for Your Needs
While this article outlines a robust GitHub deployment strategy, every project has unique requirements. You can adapt this strategy to better fit your workflows and infrastructure.
- Expand Branch Strategy: Add more branches to deploy to different environments (e.g., feature, dev, staging, prod) or even different regions. This allows for more granular control over releases (but can become hard to follow without strong documentation).
- Manual Workflow Triggers: Instead of an automatic run, you can decide to manage all your deployments manually from your repository's page. Just add
workflow_dispatchto trigger workflows manually when needed.
on:
  workflow_dispatch:
- Environment-Specific Rules: Define more specific rules or checks for each environment's branches, such as requiring additional approvals for production deployments.